Color Designation and the Hertzsprung-Russell Diagram
by Dr Jamie Love © 1997 - 2011
 © 1997 - 2011
Over a hundred years ago astronomers started to classify stars
according to their color. Letters from the alphabet were assigned
to each type, but as new information accumulated this system took
on a sequence that is not at all like the alphabet I learned!
The astronomers at Harvard put their collective foot down and
a color assignment was agreed.
The hottest stars, like Rigel,
were given the letter B. All B-type stars have a bluish-white color.
White stars, like Sirius, were a little cooler and given
the letter A. Next came a group of yellowish stars with a hint
of white. These were assigned the letter F. (I told you this doesn't
make sense!  )
)
Eventually the boys at Harvard adopted a sequence
that runs from hottest to coolest like this; B, A, F, G, K, M.
Astronomy students have been taught to remember this sequence
as the mnemonic "Be A Fine Girl, Kiss Me". In the male
dominated and perhaps lonely days of astronomy that was acceptable -
even for Harvard.  You can always substitute "Guy" for
"Girl" if that suits you.
New stars have been discovered and some of them have unusually high or low temperatures with associated colors, so the color scheme has been extended on either side. As of 1998 the color sequence for stars is; W, O, B, A, F, G, K, M, R, N, S. So the latest mnemonic is "Wow! Oh, Be A Fine Girl/Guy, Kiss Me Right Now Sweetie"! These new star types are rare and have some unusual qualities (often involving details of their "absorbance spectra", a topic we will cover in another lesson).
Each of these "color classes" is split into ten subclasses,
numbered 0 to 9.
For example, our Sun is classified as
G2 so it is slightly cooler and more yellow than Capella
which is a G8 star.
|
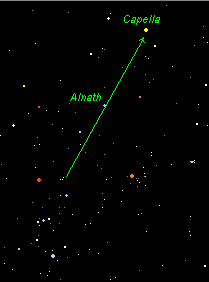
Capella? Where's Capella?
Imagine a line drawn from ORION's right knee (Saiph) through
the star in his throat, and extend that line further upwards another
40o (that's two "handfuls of sky").
Don't confuse it with Alnath! Remember that Alnath is
at the tip of TAURUS' left horn. Go further than Alnath
and you'll see that Capella easily outshines it.
| 
|
Although it is nearly the same color and temperature as our Sun, Capella is actually 90 times brighter than the our star (the Sun).
|
Capella is the brightest star in the constellation of AURIGA,
"The Charioteer" (and it is correctly named alpha-AURIGA).
The Ancients thought these stars formed an image that looked like
a chariot being drawn by four horses but I think it looks like
a kite with something stuck to its side.
The second brightest star in AURIGA (correctly named beta-AURIGA) forms the "top" of the kite and was called Menkarlina by the Ancients. It's an A-type star so it is similar in color to Sirius, but of course it isn't nearly as bright! At the tail of the kite you'll find the dim orange (K-type) star called Hassaleh. The star that is stuck onto the kite's side is called Almaaz (or epsilon-AURIGA). This is an F-type star so it is very slightly yellowish-white. AURIGA is a particularly good place to check your ability to distinguish stars of different colors because in this constellation you'll find an A-type (Menkarlina) an F-type (Almaaz) a G-type (Capella) and a K-type (Hassaleh). And Alnath, a B-type star, is nearby in TAURUS. | 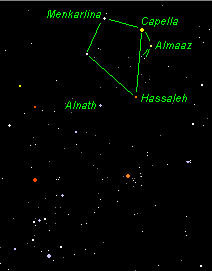
|
But don't expect the easily distinguished colors you see here. For the purpose of this month's lessons, and these lessons only, I've really gone overboard with the colors. Most star colors are not as intense. However, with some practice (and binoculars) you should start to appreciate the variety of colors among the stars.
There are some more bright stars over ORION's other shoulder. Some of them form lines!
Yes, those are the stars of GEMINI, a Zodiac constellation.
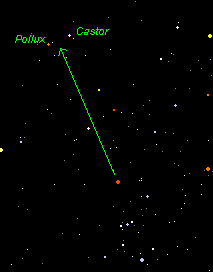
If you extend a line from Rigel to
Betelgeuse and go another 30o or so, you come to the two
bright stars of GEMINI - Castor and Pollux. The one
more southerly and easterly is Pollux. It is also the brightest
star in GEMINI, so you would expect it to be called alpha-GEMINI
using Bayer's system. Unfortunately Castor was named alpha-GEMINI
in spite of the fact that it is the second brightest star
in GEMINI and so should be called beta-GEMINI, but it's
not! 
Regardless, you should easily be able to tell the brighter (magnitude 1.1) and more orange (K-type) Pollux from its "twin" Castor which has a magnitude of 1.6 and is white (A-type).
Castor and Pollux are 5 degrees apart and so they
are a useful measuring guide.
| 
|
This constellation is supposed to look like two twins huddled together, but these stick-figures take some imagination. On the other hand, GEMINI is a very conspicuous constellation because it is formed by a series of bright stars in (nearly) straight lines.
|
You should
learn to recognize GEMINI and understand where the twin's feet
end.
The "Castor twin" (referring to the left side of the constellation starting with Castor as its head) appears to have his left foot almost on TAURUS' right horn! Indeed it looks as if he has been hit by the bull's horn because at the sole of Castor's left foot is a blood-red (M-type) star called Tejat. The rest of Castor's left foot is turned away and arches towards Alnath on the other horn! The "Pollux twin" looks like he is trying to balance on ORION's shoulder. He has a straight left leg formed by a line from Pollux to his left foot, Alhena. If you continue that line you'll come to Betelgeuse (and Rigel). His right leg is strongly bent at the knee. | 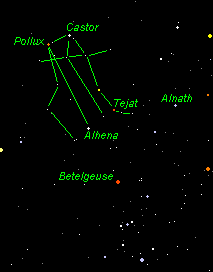
|
Is there any "sense" to all these differences in color and brightness? Is there a way to keep track of it all?
Yes! Sort of.
In the early part of this century two astronomers named Hertzsprung and Russell independently came up with a diagram that allows us to note a star's color, and thus surface temperature, along with its "luminosity".
You'll recall from last month's lesson that a star's brightness
in our sky is called its "relative magnitude", or simply
"magnitude" as we tend to say. But relative magnitude
has to do with both the star's distance AND it's "real"
brightness called its "absolute magnitude". The distance
to a star is no indication of its physics or chemistry
so astronomers like to think of the star's absolute magnitude
when discussing a star's true properties (as opposed to its observational
properties). By knowing the distance to a star and its relative
magnitude, astronomers calculate its absolute magnitude. They then
divide the star's absolute magnitude by our Sun's absolute
magnitude to get a value called "luminosity".
Luminosity
is a measure of how bright the star really is when compared to
our Sun. Some stars have an absolute magnitude much brighter
than the Sun and will have a luminosity greater than 1 while other stars are dimmer than our Sun so they have a luminosity less than 1 (but more than zero because you cannot have negative luminosity).
The Hertzsprung-Russell diagram, or simply the H-R diagram, plots star color along the horizontal axis and luminosity along the vertical axis. To make the chart fit on a single page, we actually plot the log10 of the luminosity. [If you are not familiar with the idea of log10, don't worry about it. Simply study the digrams and you will see that log10 allows us to "plot the zeros" by counting each zero as a "one".] This allows us to see at a glance a star's temperature and brightness as well as compare these two important properties to other stars on the chart.
|
Here I have plotted some stars that you should recognize.
You can see that both Betelgeuse and Rigel are very luminous but also very different in their surface temperatures. Notice that Sirius, the brightest star in our night sky, is only slightly more luminous than the Sun (26 times more, to be exact) but plenty of other stars are much more luminous. For example, Polaris is thousands of times more luminous than our Sun, but it's further away so it's not very bright in our night sky. | 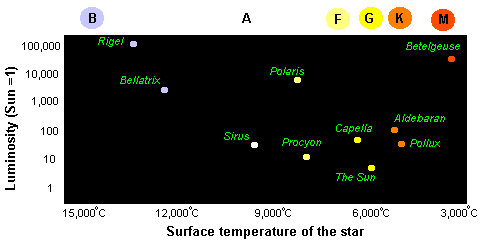
|
You should understand that an H-R diagram shows the true color and true luminosity of a star but a star's apparent brightness in our night sky (its relative magnitude) will be different because of its distance.
So far, we have been discussing the most easily seen stars. These stars are very luminous and/or very close, thus giving them a good (relative) magnitude. However, astronomers using powerful telescopes have discovered that there are plenty of stars with luminosities much less than our Sun's. For example, there is a dim star called Wolf 339. It is red (M-type) like Betelgeuse but its luminosity is only 0.00002 that of the Sun's! A complete H-R diagram must include all known stars, including the ones we can't see without telescopes.
|
If we extend our chart by plotting the thousands of known stars
on the H-R diagram we get something like this.
I've shown as big stars those we've already discussed and simply
added all the new stars as dots.
You will notice immediately that most stars run along a band stretching from the upper left to the lower right of the diagram. This band is known as the Main Sequence. Our Sun is a Main Sequence star. Along the top of the H-R diagram are the most luminous of stars. We call them giants, and the really luminous ones we call supergiants. Some (super)giants are blue, like Rigel, but most are found on the far right of the H-R diagram and are red (M-type) or orange (K-type). Betelgeuse is a red supergiant while Aldebaran and Pollux are red-orange giants (not super at all) pretty close to the Main Sequence. | 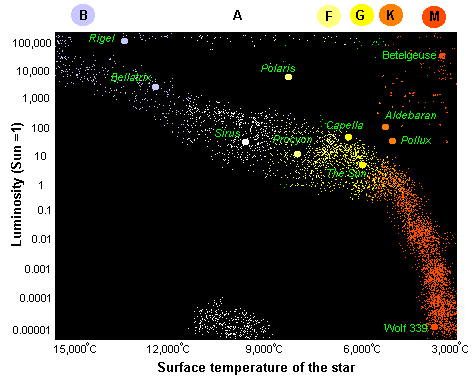
|
Notice that
some stars fall in between the giants and the Main Sequence. For example,
Polaris isn't in the giant band but very close. Some books
refer to Capella as a yellow giant but here you see it
is on the edge of the Main Sequence.
The point is that some people
define the Main Sequence and giant bands differently. It doesn't
really matter because we use the H-R diagram for comparisons not
definitions.
To the lower right is a group of white stars of low luminosity that we call white dwarfs. You haven't learned any white dwarfs yet because they are so dim and difficult to see, but they make up a sizeable population of stars. In May I'll tell you all about white dwarfs and red (super)giants when I teach you how stars age.
We will be referring to the H-R diagram throughout the rest of this course so you should make sure you understand it. You should also practice your ability to discriminate the colors of stars in the sky. This isn't easy especially for the dim ones, but get outside on a very clear night and give it a try. If you have binoculars, use them.
Remind me how those colors relate to each star's type. (Just the common ones.)
OK. I'll even throw in some examples for you to recall and on which you can practise. Remember, two stars can have similar color (temperatures) but be very different in magnitude. I'll make my point by giving you some stars with lots of variation in magnitude so you'll be able to practice your color discrimination among different brightnesses.
B-type stars are very, very hot and have a bluish-white color. Rigel (in ORION) is B8 and Alnath (in TAURUS) is B7, so they are both only slightly bluish. On the other hand, Saiph (in ORION) is B0 so it is very (beautiful) blue.
A-type stars are very hot so they are simply white. Sirius (in CANIS MAJOR) is A1 and Menkarlina (in AURIGA) is A2. Notice that they are very similar in color but very different in brightness.
F-type stars are fairly hot and yellowish-white. Procyon (in CANIS MINOR) is a good, bright, F5-type star. An example of a dim F-type is Almaaz (in AURIGA) which is F0. Polaris is an F-type star too but it is F8, so it looks pretty white to me!
G-type stars are yellow and moderately hot. Capella (in AURIGA) is a bright example of G8, but it's almost an F-type. Of course the Sun is a nice G2 but you should NOT stare at it!
K-types are orange and cool by star standards. Aldebaran (in TAURUS) is a fine example of K5 and you should compare it to Hassaleh (in AURIGA) which is a much dimmer K3.
M-types are red and the coolest stars among the "normal" stars. (Remember there are a few weird groups above and below the scale we are using.) Compare brilliant supergiant Betelgeuse (in ORION) which is type M2 with dimmer Tejat (in GEMINI) which is M3.
Indeed, now is a good time to review and practice all you have learned.
|
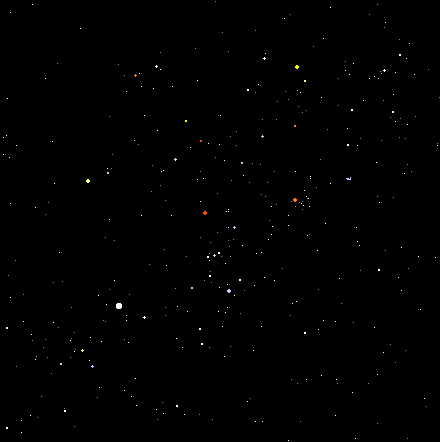
You should be able to identify six constellations and
17 bright stars in this image. (Remember, I've added more color here
than you are likely to find in the real sky.)
Can you find....?
Rigel (B8) magnitude 0.2
| 
|
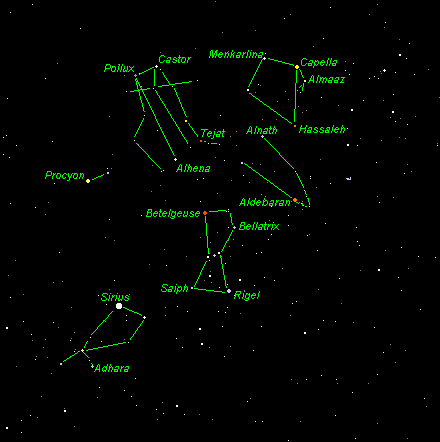
Try to find each of these stars. Which constellation are they in? Imagine the lines you need to find each constellation. Take your time and work through them carefully. First find a constellation you know well (ORION) and its obvious stars. Then use them to piece together a complete map of the sky.
Once you've given that a try, page down a bit further for the answers.
|
Go back and forth between these two images as
you study these stars and constellations.
You might also want to copy this image for later study. Place
your mouse over the image and "right click" it. A box
will appear. Choose "Save this image as ..." and put it in a suitable place on your computer.
If you print it out it will use an awful lot of black ink and you are unlikely to get the colors right anyway.
So, I've made some "black on white" images for you to download.
| 
|
Spend some time learning this sky because next month we will return
here to discuss how stars are "born" and you'll want to know what I'm talking about. Also, it might help if
you can borrow some binoculars for next month's lesson because
we will be discussing some objects that require a bit of magnification
to see them. (If you can't get binoculars don't worry. I have
some nice photos to show you anyway.)
You'll also learn a few more stars and constellations next month.
Now might be a good time to take a break. On the other hand, you are welcome to continue on to the positions of the planets which starts the second half of this month's lessons.


